Every professional pressure washing expert dreads the sudden silence from their machine. That unexpected quiet signifies a breakdown, bringing lost revenue, client frustration, and a blow to your hard-earned reputation. It is incredibly frustrating to face equipment failure without understanding why it happened or how to fix it quickly.
As a hands-on entrepreneur, your equipment is your livelihood. You need to quickly diagnose and address common issues, or at least communicate effectively with a service technician. The aim is to reduce those costly interruptions, keeping your business running at peak efficiency.
This guide provides foundational knowledge of your pressure washer’s anatomy. Its goal is to simplify your machine, give you a clear understanding of its components, and help you troubleshoot smarter while making better parts purchases. With this knowledge, proactive maintenance keeps you running smoothly and earning efficiently. Knowing the key parts of your pressure washer is essential for effective troubleshooting, preventive care, and maximizing both uptime and the lifespan of your valuable equipment.

The Foundation of Profit: Why Understanding Your Pressure Washer’s Anatomy Matters
As a professional in pressure washing, your tools are more than just machines. They are essential business partners. Their reliability directly impacts your bottom line and your ability to deliver consistent results for clients.
The Professional’s Edge: Beyond Just “Getting the Job Done”
Knowing the ins and outs of your pressure washer isn’t merely about technical prowess; it is a strategic business advantage.
Maximizing Uptime and Minimizing Costly Downtime
Every minute your machine is down means lost revenue. If a hose bursts or your pump loses pressure, understanding the specific component involved allows for faster diagnosis and a quicker acquisition of the right replacement part. This reduces time spent waiting for a repair. Consider a commercial job where your spray gun suddenly stops building pressure. If you understand potential culprits—a worn nozzle, a sticking unloader valve, or an air leak—you can often identify the issue within minutes. This may even allow for an on-site fix, preventing the need to pack up and reschedule.
Protecting Your Investment and Extending Equipment Lifespan
Professional-grade pressure washing equipment represents a significant investment. Just as a high-performance vehicle requires specific maintenance, your pressure washer demands proper care for its various components. Regular checks and timely replacement of worn parts prevent minor issues from escalating into major, costly failures that could damage your machine beyond repair.ew
Gaining Confidence in Diagnosing and Communicating Issues Effectively
Knowledge instills confidence when problems arise. Instead of vaguely describing “it’s not working right” to a supplier or mechanic, you can confidently state, “I suspect my unloader valve is sticking, causing constant bypass.” Or, “I’m getting water from the weep holes on my pump, indicating a high-pressure seal failure.” This precision saves diagnostic time, reduces labor costs, and ensures you get the right solution faster.
Building a Reputation for Reliability and Professionalism
Clients rely on you to show up, complete the job efficiently, and deliver consistent quality. Frequent equipment breakdowns erode that trust. By minimizing downtime and showcasing your command over your tools, you reinforce your image as a professional who takes their business seriously and is always prepared.
Your Machine as a Business Partner
View your pressure washer not just as an asset but as a key employee. Investing time in understanding your machine’s anatomy is crucial, much like training a team member. The frustration of unexpected equipment failure—the sudden silence, lost revenue, and rescheduling calls—often stems from a lack of immediate insight into the problem. This guide aims to bridge that gap, providing enough knowledge to quickly diagnose and address common issues. It helps transform you from a victim of breakdowns into a master of your machine’s uptime.
A Comprehensive Pressure Washer Component Guide: What to Expect
In the following sections, we will delve into the core systems and individual components of your professional pressure washer. We will examine how each part works, its purpose, common issues it faces, and proactive maintenance and troubleshooting steps. This comprehensive pressure washer component guide is designed specifically for the pragmatic professional, empowering your understanding for business continuity.
The Core Powerhouse: Engine, Motor, and Pump Systems
At the heart of every pressure washer are two fundamental systems working in concert: the power source (engine or motor) and the pump. This dynamic duo generates the force you rely on for cleaning.
The Driving Force: Engines and Motors
The engine or motor provides the raw power to drive the pump, converting fuel or electricity into mechanical energy.
Types of Power Sources
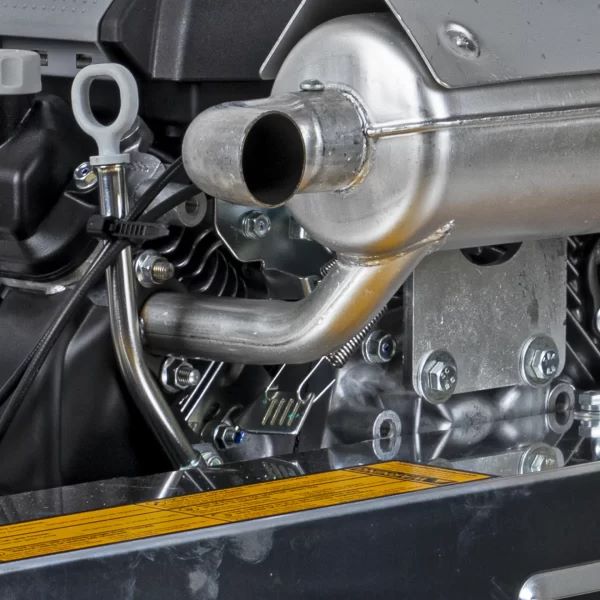
Gasoline Engines These are the workhorses for most professional mobile pressure washing rigs. They are internal combustion engines, similar to those found in lawnmowers or small generators. Key components include the carburetor (mixes air and fuel), spark plug (ignites the mixture), air filter (prevents debris from entering the engine), and exhaust system (expels burnt gases). Gasoline engines offer portability and high power output, crucial for demanding jobs away from power outlets.

Electric Motors Electric motors are common in stationary setups or where noise and fumes are a concern. They convert electrical energy into mechanical energy. Induction motors, found in many professional electric models, are known for durability and quiet operation. Universal motors, often in smaller, consumer-grade units, can run on AC or DC but are less durable for continuous professional use. Power considerations for larger units often involve single-phase versus three-phase electricity; three-phase motors are more efficient and powerful but require industrial electrical hookups.
Key Considerations for Professionals
Horsepower and Kilowatt Ratings: Horsepower (HP) and kilowatt (kW) ratings indicate the engine or motor’s power output. Higher HP or kW generally means the ability to drive a larger GPM (Gallons Per Minute) pump at higher PSI (Pounds per Square Inch). For professionals, understanding this correlation is vital for selecting a machine that can handle demanding tasks.
Fuel Efficiency and Run-Time: For gasoline units, fuel tank size and engine efficiency dictate how long you can operate before refueling. This impacts productivity on large jobs, especially where access to fuel is limited. A more efficient engine means less downtime for refueling and lower operating costs.
Electrical Requirements for Electric Models: Operating electric pressure washers requires a compatible power supply. Not only must the voltage (e.g., 120V, 240V) match, but the amperage draw of the motor must be within the circuit breaker’s capacity. Overloading a circuit can lead to tripped breakers and costly downtime.
Vibration Dampening and Mounting: Professional-grade machines often feature robust frames and vibration dampeners (rubber isolators) between the engine/motor and the frame. This reduces stress on components, extends the life of the entire unit, and makes operation more comfortable.
Signs of Wear and Common Issues: For gasoline engines, common issues include fuel system clogs (from old fuel or debris), dirty air filters (restricting airflow), and faulty spark plugs (leading to misfires or no start). For electric motors, overheating (often due to prolonged use, poor ventilation, or low voltage), worn bearings, or electrical short circuits are typical concerns. Paying attention to unusual noises, excessive heat, or performance drops can help catch these issues early.
The Heart of the Machine: Demystifying the Pressure Washer Pump
The pump is arguably the most critical pressure washer component. It transforms low-pressure water into high-pressure water. Understanding how pressure washer pumps work is fundamental to troubleshooting.
How Pressure Washer Pumps Work: The Principles of High Pressure
A pressure washer pump draws in a large volume of low-pressure water and then forces that water through a much smaller opening (the nozzle). This restriction, combined with the pump’s mechanical action, generates immense pressure. The pump uses reciprocating pistons or plungers to create a vacuum, draw water into a chamber, and then forcefully push it out under high pressure.
Understanding PSI and GPM: PSI (Pounds per Square Inch) measures the force of the water; higher PSI means more cutting power for stubborn grime. GPM (Gallons Per Minute) measures the volume of water flow; higher GPM means faster cleaning over a larger area, as you are moving more water. For a professional, the ideal machine balances both. A high PSI with low GPM might remove tough stains but take forever. High GPM with low PSI might clean quickly but lack the necessary force. The interplay is crucial: a pump rated for a specific GPM at a certain PSI must have the right engine/motor to drive it.
Role of the Inlet Filter: Before water even enters the pump, it passes through an inlet filter. This small, often overlooked component is a pump’s first line of defense against debris, sediment, and contaminants from your water source. A clogged or missing inlet filter is a direct path to pump damage.
Types of Pressure Washer Pumps
Axial Cam Pumps: These pumps are typically found in consumer-grade and light-duty commercial pressure washers. Their design is compact, and they often attach directly to the engine crankshaft (direct drive). While affordable and convenient, they are less durable than triplex pumps, designed for intermittent use rather than continuous professional operation. Overheating is a common issue due to their direct drive and limited cooling.
Triplex Plunger Pumps: This is the professional standard and the heart of most heavy-duty commercial pressure washers. Triplex pumps feature three plungers (pistons with a ceramic coating) that move in sequence, providing a smoother, more consistent flow and superior durability. Designed for continuous use, they are highly durable and, importantly, rebuildable. This means individual components like seals and valves can be replaced, extending the pump’s lifespan indefinitely, unlike axial pumps which are often “replace-only.” Their robust construction and availability of repair kits make them a long-term investment.
Diaphragm Pumps: While not used for high-pressure washing, diaphragm pumps are sometimes found on pressure washing rigs for specialized chemical injector applications. They use flexible diaphragms rather than plungers to move fluids, making them excellent for corrosive chemicals as the pump internals do not directly contact the fluid.
Internal Anatomy of a Triplex Pump
Understanding the internal workings of your triplex pump allows for targeted maintenance and troubleshooting.
Power Transmission Components
Crankshaft and Connecting Rods: The crankshaft is the central rotating shaft that converts the rotary motion of the engine/motor into the reciprocating motion required by the plungers. Connecting rods link the crankshaft to the plungers. Wear in these components, though rare with proper lubrication, can lead to excessive vibration or catastrophic failure.
Pistons and Ceramic Plungers: These are the workhorses that move the water. In professional triplex pumps, the plungers are typically made of solid ceramic, which is extremely hard and resistant to wear and corrosion. However, they can chip or crack if exposed to impacts or sudden temperature changes. Signs of wear include scoring or pitting, which can lead to premature seal failure.
Pressure Control and Containment Systems
Valves (Inlet/Check Valves, Discharge Valves): These are the pump’s “breathing” system. Inlet valves (or check valves) allow water to be drawn into the pump chamber during the plunger’s suction stroke but prevent it from flowing back out. Discharge valves open to allow pressurized water to exit the pump during the discharge stroke but prevent high-pressure water from flowing back into the chamber. Both sets of valves are critical for pressure generation. Common issues include sticking (due to mineral buildup or debris), pitting, or wear on the valve seats, leading to pressure loss or erratic pressure.
Seals and Packing (HP Seals, LP Seals, Oil Seals): The seals are crucial for containing the water and oil within the pump. High-pressure (HP) seals (also called packing) prevent pressurized water from leaking out around the plungers. When they wear, you will typically see water dripping from the “weep holes” beneath the pump head. This is the most common wear item on a triplex pump. Low-pressure (LP) seals, also around the plungers, help prevent air from being drawn into the pump during the suction stroke. Oil seals prevent pump oil from leaking out of the crankcase or contaminating the water side. Signs of leaks (water or oil) around the pump head are direct indicators of worn seals and packing, requiring prompt replacement to prevent internal damage or loss of pressure.
Lubrication and Structural Housing
Bearings and Oil: The bearings support the crankshaft and connecting rods, allowing smooth rotation. The pump’s crankcase holds oil, which lubricates these moving parts and helps dissipate heat. Regular oil changes (using the manufacturer-specified pump oil, not engine oil) are paramount. Dirty or low oil can lead to premature bearing wear, causing excessive noise, vibration, and ultimately, pump failure. Thermal considerations are important; pumps generate heat, and proper lubrication is vital to prevent overheating.
Pump Head/Manifold: The pump head (or manifold) is the block of material that houses the valves, seals, and plungers. It is typically made of forged brass or, in some cases, aluminum or stainless steel. Brass is preferred for its durability and corrosion resistance. Cracks in the pump head, often caused by freezing water or severe impacts, are usually catastrophic and necessitate replacement of the entire manifold or pump.
Understanding Pump Drive Systems
The way your pump connects to your engine or motor significantly impacts its lifespan and performance characteristics.
Direct Drive: Direct drive systems offer a compact design, making the overall unit smaller and lighter, often at a more affordable upfront cost. However, the pump’s RPM (revolutions per minute) directly matches the engine’s RPM (e.g., 3400-3600 RPM). This high speed generates more heat and leads to faster wear on pump components, particularly seals and bearings. They are also less forgiving of cavitation (lack of water supply).
Belt Drive: Considered the gold standard for professional longevity, belt drive systems allow the pump to operate at a lower RPM (e.g., 1450-1750 RPM) than the engine. This significantly reduces heat, wear, and vibration, translating to a vastly extended pump lifespan. Belts also absorb shock and vibration, protecting both the engine and pump. The disadvantages include a larger and heavier footprint than direct drive units, and the need for periodic belt tension checks and replacement. They are also more expensive upfront.
Gear Drive: Similar to belt drive, gear drive systems allow the pump to operate at a reduced RPM (typically around 1450-1750 RPM) compared to the engine, extending pump life and reducing heat. They offer a more compact footprint than belt drive units. However, they are internally more complex due to gears and can be more expensive to repair if the gear system fails. They also require specialized gear oil.
Selecting the Right Drive System for Your Business Needs: For the serious professional who relies on their machine daily, the investment in a belt or gear drive system will pay dividends in reduced maintenance, fewer breakdowns, and significantly longer equipment life. If portability and initial cost are paramount for lighter, less frequent commercial use, a direct drive might suffice, but understanding its limitations is important.
Control, Delivery, and Protection Components
Beyond the engine and pump, a network of control, delivery, and protective components ensures your pressure washer operates safely, efficiently, and effectively. These are the parts of a pressure washer that you interact with constantly.
Unloader Valves: The Critical Control Point
The unloader valve is often referred to as the “brain” of your pressure washer. It is an essential safety and operational component that manages water flow when the trigger gun is released.
Function and Importance
The primary function of the unloader valve is to divert water flow back to the pump inlet (or a buffer tank) when the spray gun trigger is closed. This prevents the pump from dead-heading (building excessive pressure against a closed system), which would quickly lead to overheating and catastrophic pump damage. It acts as a bypass, protecting the pump from both overheating and over-pressurization.
Types of Unloader Valves
Trapped Pressure versus Flow-Actuated Unloaders: Trapped pressure unloaders are the most common type on professional machines. When the trigger gun is closed, they “trap” pressure in the high-pressure hose. This immediate pressure signal tells the unloader to go into bypass mode. When the trigger is pulled, the immediate drop in pressure causes the unloader to go back into active mode. They provide a crisp “on-off” feel at the gun.
Flow-actuated unloaders respond to changes in water flow rather than pressure. When water flow stops (gun closed), they go into bypass. When flow resumes, they activate. They generally lead to a softer feel at the gun and are less prone to pressure spikes, but some users find the delay in pressure buildup slightly less responsive. These are often preferred for systems with longer hoses or where quick on-off cycling is frequent.
Adjustable versus Fixed Pressure Settings: Most professional unloaders are adjustable, allowing you to fine-tune the bypass pressure setting. This is critical for matching the unloader to your pump’s capabilities and ensuring proper operation. Fixed unloaders are less common in professional settings as they offer no flexibility.
Common Malfunctions and Troubleshooting
An unloader valve malfunction can manifest as surging pressure, complete loss of pressure, or the machine constantly running in bypass mode even with the gun open. Surging is often caused by a sticking unloader piston or worn O-rings inside the valve. Loss of pressure could be a sign the unloader is stuck in bypass, or the spring is broken. If water is always flowing through the bypass hose even when the gun is open, the unloader may be stuck or its spring tension incorrect. Signs of wear include leaks around the unloader body, a soft or unresponsive trigger, or inconsistent pressure. Internal components like springs, seats, and O-rings can wear out and are often replaceable via rebuild kits.
High-Pressure Hoses: The Lifeline of Your Operation
Your high-pressure hose is the flexible conduit that delivers pressurized water from your pump to your spray gun. It experiences immense force and stress, making its quality and condition paramount for safety and performance.
Material and Construction
Professional-grade high-pressure hoses are built to withstand extreme pressure, abrasion, and often, chemical exposure. Single-wire and double-wire braided hoses feature one or two layers of steel wire braiding within their construction, providing the strength needed for high PSI. Double-wire hoses offer superior pressure handling and durability for heavy-duty applications. Textile-braided hoses are less common in professional use for high pressure but sometimes seen in lighter-duty hoses or specific chemical transfer lines; they are more flexible but have lower pressure ratings. Look for hoses with durable outer jackets resistant to dragging across concrete or sharp edges. Flexibility is key for easy handling and coiling. Always ensure the hose’s pressure rating exceeds your pump’s maximum PSI.
Fittings and Connections
The points where your hose connects to the pump and gun are critical for maintaining pressure and preventing leaks. Quick connects allow for rapid attachment and detachment of hoses, guns, and nozzles, saving significant time. Look for stainless steel options for durability. Threaded fittings are a traditional method, providing a very secure connection but slower to assemble or disassemble. Swivel fittings, often integrated into the gun or hose, allow the hose to rotate freely, preventing tangles and kinks. Using high-quality O-rings and thread sealant (when needed) is crucial to ensure proper sealing and prevent leaks that lead to pressure loss and water waste.
Maintenance and Care
Proper care of your high-pressure hose is non-negotiable for safety and longevity. Preventing kinking is crucial as kinks create weak spots in the hose’s internal braiding, leading to premature failure. Always uncoil hoses fully before use. Coil hoses neatly after each use, avoiding twists, to prevent damage and extend life. Regularly inspect the entire length of your hose for cuts, bulges, leaks, or fraying near fittings. A bursting high-pressure hose is extremely dangerous and can cause severe injury. Never attempt to repair a damaged hose with tape or clamps. Replace it immediately.
Spray Guns and Wands: Precision and Control
The spray gun and wand, also known as the lance, serve as your main tools for interacting with the cleaning surface, providing precision, comfort, and control.
Ergonomics and Durability for Professionals
For hours of continuous use, the ergonomics of your spray gun are critical to reduce operator fatigue. Look for smooth, low-effort trigger pulls. A reliable safety lock is essential to prevent accidental discharge. Wands come in various lengths (e.g., 24″, 36″, 48″, 72″) to suit different applications and reduce bending. Stainless steel is the most durable material for the lance.
Swivels and Couplings
Incorporating a high-quality stainless steel swivel between your gun and hose prevents tangles and twists, significantly reducing strain on your wrist and arm. Swivels allow the hose to move freely, preventing kinks that can damage the hose and restrict flow.
Nozzles: The Architects of Flow
Nozzles are deceptively simple yet profoundly impactful. They are the final point of pressure generation and the architects of your cleaning pattern.
Understanding Nozzle Types and Their Applications
The shape and angle of the water stream are determined by the nozzle. Each type serves a specific purpose.
- Degree Nozzles: These are color-coded and define the fan pattern.
- 0-degree (Red): Pinpoint stream, maximum impact. Use with extreme caution as it can damage surfaces. Good for spot cleaning tough grime or reaching high areas.
- 15-degree (Yellow): Chisel-shaped stream, aggressive cleaning. Excellent for removing stubborn dirt, paint prep, or stripping.
- 25-degree (Green): Wider fan, general cleaning. Good for most surfaces, effective for rinsing and lighter cleaning.
- 40-degree (White): Widest fan, gentle cleaning. Ideal for delicate surfaces like vehicles, windows, or light rinsing.
- Soap/Low-Pressure (Black or other color, often 65-degree): Large orifice, no pressure. Used for applying detergents through a chemical injector.

- Rotary/Turbo Nozzles: These nozzles combine the impact of a 0-degree stream with the coverage of a wider fan. Internally, a ceramic insert spins the 0-degree stream in a circular motion. They are highly effective for deep cleaning concrete or removing stubborn grime from durable surfaces and can significantly speed up flat surface cleaning. However, they can be aggressive and potentially damaging if used improperly or on delicate surfaces. They also require more frequent replacement due to internal wear.
- Specialized Nozzles: For specific jobs, specialized nozzles exist, such as forward and reverse-firing nozzles for clearing drains or multiple precision nozzles integrated into rotating surface cleaner tools for efficient flatwork.
Nozzle Sizing (Orifice Size)
This is critical for optimal performance and pump longevity. Nozzles are sized by their orifice (hole) diameter, which must match your pump’s GPM and PSI output. An undersized nozzle creates excessive back pressure, overworking your pump and unloader valve. An oversized nozzle results in a significant drop in pressure, making your machine ineffective. A nozzle chart is essential for selecting the correct size. Using the wrong nozzle size is a common cause of premature pump wear, unloader valve issues, and subpar cleaning results.
Signs of Wear and Replacement
Nozzles wear out. The high-pressure water stream erodes the internal orifice, causing it to enlarge over time. If your machine feels less powerful or your PSI gauge reads lower, a worn-out nozzle is often the culprit and should be replaced. Debris can also get lodged in the nozzle orifice, causing erratic spray patterns or complete blockage. Always clean clogged nozzles carefully with a nozzle cleaning tool.
Chemical Injectors: Applying Solutions Effectively
For many professional cleaning jobs, applying detergents or specialized chemicals is essential. The chemical injector allows you to draw chemicals into the water stream.
Downstream versus Upstream Injection
The placement of the injector determines whether chemicals pass through the pump or are introduced after the pump.
Downstream Injection: The chemical injector is placed after the pump, usually near the high-pressure hose outlet or at the gun. A venturi effect is created by restricting water flow, drawing chemicals into the low-pressure side of the stream. Chemicals do not pass through the pump, protecting the pump’s internal components (seals, valves) from corrosive chemicals. This is the preferred method for most professional applications. However, it requires a low-pressure nozzle (e.g., black soap tip) to create the necessary venturi effect. Chemical dilution rates can also be affected by hose length and elevation.
Upstream Injection: The chemical injector is placed before the pump, drawing chemicals directly into the pump’s water inlet. This method can deliver chemicals under high pressure, allowing for specific applications. However, chemicals pass directly through the pump, potentially damaging pump seals and other components over time, especially with harsh chemicals. This method is less common for general pressure washing.
Components of a Chemical Injector
A typical chemical injector involves a few key parts: an orifice, a precisely sized hole that creates the venturi effect; a check valve, which prevents water from flowing back into the chemical container and prevents chemical from siphoning when the machine is off; and the venturi effect itself, the principle by which the flow of water through a constricted opening creates a vacuum that draws in chemicals.
Maintenance and Troubleshooting
Chemical injectors are prone to clogging or malfunction, especially with undissolved chemicals or if not flushed properly. Clogging is the most common issue. Chemical residue or debris can block the injector’s orifice or check valve, preventing chemical draw. Inconsistent draw can be due to a partially clogged injector, an air leak in the chemical suction line, or an incorrect nozzle. Ensure your chemicals are mixed correctly to avoid crystallization that can clog the injector. Always flush your chemical injector thoroughly with clean water after each use to prevent chemical buildup and corrosion, which can seize the internal components.
The Unsung Heroes: Minor Components with Major Impact
While the engine, pump, unloader, and hose are the stars, several smaller pressure washer components play crucial roles in safety, efficiency, and longevity. Ignoring them can lead to significant headaches.
Thermal Relief Valve
The thermal relief valve is a critical safety device designed to protect your pump from overheating, particularly when the machine runs in bypass mode for extended periods (e.g., if you leave the engine running but are not actively spraying). If the water inside the pump recirculating in bypass mode reaches a predetermined temperature (typically around 140-145°F or 60-63°C), the thermal relief valve opens, discharging a small amount of hot water. This allows cooler water from the inlet to replace it, preventing heat buildup that can damage pump seals and internal components. These valves can stick open (causing a constant trickle of water), stick closed (leading to pump overheating), or have an incorrect temperature rating. Regular inspection for leaks or signs of consistent water discharge when not overheated is important.
Water Filters/Inlet Filters
The water filter (or inlet filter) is the pump’s first line of defense. It prevents particulate matter—sediment, rust flakes, sand, or other debris—from entering the pump. Even tiny particles can cause abrasive wear to seals, plungers, and valves, leading to premature pump failure. Common types include simple mesh filters (often found at the water inlet connection), Y-strainers (more robust, inline filters), and sometimes cartridge filters for very dirty water sources. These filters must be cleaned or replaced regularly. A clogged inlet filter restricts water flow to the pump, leading to cavitation (the formation of air bubbles in the water due to insufficient supply), which sounds like marbles rattling inside the pump and can cause severe damage.
Pressure Regulators/Bypass Valves
While similar in function to an unloader valve, a true pressure regulator or bypass valve allows for fine-tuning of the output pressure independently of the unloader. An unloader primarily manages bypass. A separate pressure regulator can be adjusted to reduce the working pressure without affecting the engine RPM or GPM, useful for delicate cleaning tasks where lower PSI is required. For instance, if you need to clean a house with delicate siding that requires only 1000 PSI, but your machine is capable of 3000 PSI, a pressure regulator allows you to dial down the pressure safely and consistently.
Quick Connects, Adapters, and Fittings
These small but vital items link everything together—hoses to pumps, hoses to guns, nozzles to wands. High-quality quick connects, adapters, and fittings are essential for preventing leaks, which cause pressure drops and wasted water. Always opt for brass or, ideally, stainless steel fittings for professional use. Plastic fittings are prone to cracking and wear under high pressure. Stainless steel offers superior corrosion resistance and durability.
Gauges (Pressure, Hour Meters)
A pressure gauge (ideally liquid-filled for vibration dampening) mounted on your pump allows you to constantly monitor your working pressure, confirming proper unloader function and identifying pressure drops due to worn nozzles or internal pump issues. An hour meter is invaluable for tracking engine/pump run time, enabling you to adhere to manufacturer-recommended maintenance schedules (e.g., oil changes, filter replacements). Ensure your gauges are accurate; a faulty gauge can lead to incorrect diagnostics.
From Theory to Practice: Proactive Maintenance and Troubleshooting Your Components
Understanding the parts of a pressure washer is only half the battle. The real power comes from applying that knowledge through a rigorous maintenance schedule and a systematic approach to troubleshooting. This is where your expertise as a professional truly shines.
A Professional’s Preventative Maintenance Checklist
Consistent preventative maintenance is your best defense against unexpected downtime.
Daily Checks
- Hose integrity: Before each job, uncoil and inspect your high-pressure hose for any cuts, bulges, leaks, or signs of wear, especially near fittings.
- Nozzle cleanliness: Check that your nozzles are clear of debris and not enlarged. Always carry a nozzle cleaning tool.
- Oil levels: Check both the engine oil and pump oil levels. Top off if necessary, and look for any milky appearance in the pump oil, which indicates water intrusion (a sign of failing seals).

Weekly/Bi-Weekly Checks
- Filter cleaning: Remove and clean your inlet water filter. If it is a cartridge filter, inspect for damage and replace if necessary.
- Belt tension (if applicable): For belt-drive systems, check the tension of the belts. They should have a small amount of play but not be excessively loose, which causes slippage and wear.
- Fitting inspection: Inspect all quick connects and threaded fittings for leaks or wear. Replace O-rings as needed.
Monthly/Quarterly Checks
- Pump oil changes: Change your pump oil according to manufacturer specifications (typically every 200-500 hours, or quarterly for heavy use). Use only specific pressure washer pump oil.
- Spark plug inspection/replacement (gasoline engines): Inspect the spark plug for fouling or wear. Replace if necessary.
- Air filter cleaning/replacement (gasoline engines): Clean or replace the engine’s air filter. A dirty air filter starves the engine of air, reducing power and efficiency.
- Valve and seal inspection: While you will not disassemble the pump monthly, be vigilant for any new water leaks from the weep holes or unloader, indicating worn seals or sticking valves.
Seasonal/Annual Checks
- Winterization procedures: If operating in freezing temperatures, perform proper winterization to prevent water from freezing inside the pump, unloader, and hoses, which can cause catastrophic damage. This usually involves flushing with antifreeze.
- Comprehensive system check: Conduct a thorough inspection of the entire unit for loose bolts, corroded connections, or any other signs of wear or impending failure.
Developing a Maintenance Log
Keep a physical or digital log of all maintenance performed, including dates, hours, and parts replaced. This helps you track component lifespan, anticipate future needs, and demonstrate good care if you ever sell the equipment.
Pinpointing Problems: A Component-Based Troubleshooting Guide
When your machine inevitably falters, a systematic approach, guided by your knowledge of its pressure washer troubleshooting parts, will save you time and money.
No Pressure or Low Pressure
- Pump issues: Worn seals (most common), sticking valves, or cavitation (due to restricted water flow, often a clogged inlet filter or kinked hose).
- Nozzle issues: A clogged nozzle will cause erratic pressure; an oversized nozzle will result in consistently low pressure.
- Unloader valve malfunction: If the unloader valve is stuck open or constantly bypassing, you will lose pressure.
- Water supply issues: Insufficient water supply from your spigot, a clogged inlet filter, or a kinked garden hose can starve the pump, leading to low pressure.
- Air leaks in the system: Air being drawn into the system (e.g., loose fittings on the suction side, damaged garden hose) can cause a loss of prime and pressure.
Engine/Motor Issues (Won’t Start, Stalling, Overheating)
- Fuel system (gasoline engines): Check for old or bad fuel, a clogged fuel filter, or a dirty carburetor.
- Ignition system (gasoline engines): Inspect the spark plug and spark plug wire.
- Air filter obstruction: A dirty air filter can choke the engine.
- Oil level/quality: Low or dirty engine oil can cause stalling or prevent starting (many engines have low-oil shutdowns).
- Electrical faults (electric motor): Check power supply, circuit breakers, and motor wiring for any issues. Overheating in an electric motor can be due to a faulty fan or prolonged overload.
Water Leaks
- Hose connections and fittings: Most common. Check all quick connects, adapters, and threaded connections for loose fit or worn O-rings.
- Pump seals: Water dripping from the weep holes beneath the pump head indicates failing high-pressure seals.
- Unloader valve leaks: Leaks from the unloader valve body or bypass line when the gun is closed can indicate internal wear.
- Pressure relief valve activation: If the thermal relief valve is constantly discharging water, the pump may be overheating due to prolonged bypass or a faulty valve.
Vibration and Noise
- Loose components: Check all bolts, nuts, and mounting hardware on the engine, pump, and frame.
- Pump cavitation or worn bearings: A rattling or grinding noise from the pump could indicate cavitation (insufficient water supply) or worn internal bearings.
- Engine/motor imbalance: This can be due to internal engine issues or a bent shaft.
Pulsating Pressure
- Air in the system: Often caused by an air leak on the suction side, a loose fitting, or a low water supply, leading to inconsistent pressure.
- Clogged inlet filter: Restricts water flow, causing the pump to struggle and pulsate.
- Sticking valves in the pump: If the inlet or discharge valves are not opening and closing properly, it can lead to erratic pressure.
- Worn unloader valve: A sticking unloader valve can cause pressure to fluctuate wildly.
Chemical Injector Not Drawing
- Clogged injector: The most common cause. Chemical residue or debris can block the chemical injector’s orifice or check valve.
- Incorrect nozzle: Ensure you are using a low-pressure nozzle (typically a black soap tip) to create the necessary venturi effect for downstream injection.
- Air leak in the suction line: Check the hose from the chemical container to the injector for any cracks or loose connections.
- Chemical too viscous: Some very thick chemicals may be difficult for the injector to draw. Dilute further if safe to do so.
Smart Investments: Sourcing Quality Replacement Parts and Upgrades
Knowing your machine’s components also means knowing how to procure the right replacement parts of a pressure washer when needed. This is not just about finding the cheapest option; it is about smart investments that uphold your business’s continuity and reputation.
OEM versus Aftermarket Parts: Making Informed Decisions
When a part needs replacing, you will often face a choice: Original Equipment Manufacturer (OEM) or aftermarket.
OEM (Original Equipment Manufacturer) Parts: These parts are made by or for the original manufacturer of your pressure washer or its primary components (like the pump manufacturer). Their advantages include guaranteed fit and compatibility, often higher quality control, design specifically for your machine’s specifications, and maintained warranty coverage. They generally offer the best reliability and longevity. The primary disadvantage is that they are typically more expensive.
Aftermarket Parts: These parts are made by companies other than the original manufacturer. They are usually more affordable and have wider availability, and sometimes offer innovative designs. However, quality can vary dramatically. The fit might not be perfect, and they may not meet the exact specifications of the original part, potentially leading to faster wear or performance issues.
When to Choose OEM for Critical Components: For critical pressure washer components like pump seals, valves, plungers, or unloader valve rebuild kits, investing in OEM or high-quality, reputable aftermarket equivalents is often worth the extra cost. These parts directly impact performance and the longevity of your most expensive components. For less critical items like certain fittings or general hoses, quality aftermarket options can be perfectly suitable.
Identifying Reputable Aftermarket Suppliers: Look for suppliers with a strong reputation in the professional pressure washing community. Read reviews, ask for recommendations, and confirm they offer warranties on their parts. A truly reputable supplier will often specify that their aftermarket parts meet or exceed OEM specifications.
What to Look For in a Parts Supplier
Your parts supplier is more than just a vendor; they are a crucial partner in maintaining your uptime.
Quality of Materials and Manufacturing Standards: A good supplier prioritizes quality. For example, when buying replacement pistons or seals, inquire about the material (e.g., ceramic versus stainless steel plungers, type of elastomer for seals) and the manufacturing process. High-grade materials mean longer lasting parts.
Warranty and Return Policies: Understand the supplier’s warranty on parts. A clear and fair return policy is a sign of confidence in their products and can save you headaches if a part is incorrect or faulty.
Availability and Shipping Speed: This is paramount for a professional. A supplier who can quickly ship the specific pressure washer component you need means less downtime. Look for robust inventory and efficient logistics.
Expert Support and Technical Assistance: A truly valuable supplier offers more than just parts; they offer expertise. Can you call them with a troubleshooting question? Do they have technical staff who understand pressure washers and can help you identify the correct part? This expert support can be invaluable.
Strategic Upgrades for Enhanced Performance and Durability
Sometimes, replacing a part is not just about fixing a break; it is an opportunity for an upgrade.
Upgrading Pump Type: If you started with a direct-drive axial cam pump and your business has grown, consider upgrading to a belt or gear-drive triplex plunger pump. This is a significant investment but will transform your machine’s durability and rebuild ability, offering true professional-grade longevity.
Heavy-Duty Hoses and Fittings: Upgrading from a single-wire to a double-wire braided high-pressure hose or from brass to stainless steel fittings can dramatically increase reliability and safety, reducing the frequency of hose failures and leaks.
High-Quality Guns and Wands: Investing in a premium spray gun with a comfortable grip, smooth trigger, and integrated swivel fitting can significantly reduce operator fatigue and enhance control during long working hours.
Considerations for Investing in Rebuild Kits versus Full Replacements: For triplex pumps, many components like seals, valves, and even pistons are available in rebuild kits. Often, rebuilding a pump is significantly more cost-effective than replacing the entire pump head or complete pump, assuming the pump body is sound. This is a core benefit of professional-grade equipment.
The Long-Term Value of Quality
Remember, your pressure washer is a revenue-generating asset. Choosing quality professional-grade parts, understanding OEM parts versus trusted aftermarket options, and partnering with knowledgeable suppliers is not just about maintenance. It is about making smart, long-term investments in your business’s profitability and reputation. Avoiding the “cheap now, expensive later” trap by prioritizing durability and smart maintenance ensures your valuable equipment delivers maximum uptime and a healthy bottom line for years to come.
Understanding the core parts of your pressure washer isn’t just a mechanic’s hobby; it is a business imperative. It is the knowledge that empowers you to keep your equipment running, minimize costly downtime, and ultimately, maximize your uptime and the lifespan of your valuable assets. Explore our comprehensive catalog of genuine replacement parts for all major pressure washer components and give your machine the best foundation for continued success.

More Useful Blogs:
- Advantages of a Hot Water Pressure Washer Trailer – Clean faster, work smarter, and boost professionalism with a fully integrated hot water setup.
- Precision & Comfort: The Strategic Advantage of a Custom Pressure Washer Gun – Boost efficiency, tackle tough jobs, and present a professional image with every service.
- Commercial Pressure Washing Trailer Maintenance Tips – Maintain your commercial pressure washing trailer to extend life and maximize profits.
- Gas vs Diesel Power Washer: What You Should Know – Compare the pros and cons of gas vs. diesel power washers to choose the right one for your business model.
- Where to Find a Pressure Washer Trailer for Sale – Discover trusted sources to buy a quality trailer that meets your professional needs.
- The Professional’s Edge: Why a Heated Pressure Washer is Your Ultimate Business Accelerator – Boost cleaning speed and profits with a heated pressure washer—your key to professional-grade performance.
- How to Choose a Pressure Washer for Lasting Success – Make informed choices that drive reliability, reduce downtime, and power long-term business growth.
- The Ultimate Edge: Enclosed Pressure Washer Trailers – Protect gear, prevent downtime, and boost professional reliability.


